
How to create a Header in HTML & WORDPRESS sites Your Guide to Creating Stunning Headers

How to create a Header in HTML & WORDPRESS sites -Start by emphasizing the importance of a website header as the first thing visitors see. Mention how a well-designed header not only improves the visual appeal but also enhances user experience and branding. Set the expectation that this guide will cover various methods to create headers for both HTML and WordPress sites, suitable for beginners and advanced developers alike.
How to Create a Header for an HTML Site
Before diving into the creation process, let’s explore some header examples from popular websites.

2. Spendesk

Here are some examples of what headers can look like.
Create a header with HTML code.
Creating a header for your HTML site is a straightforward process. A header typically contains elements like your site’s logo, navigation menu, and sometimes even a search bar or contact information. Here’s a step-by-step guide to creating a basic header using HTML:
1. Start with the <header> Element
The <header> element is used to define the header section of your webpage. It can contain headings, navigation links, logos, and other introductory content.
<header>
  <h1>My Website</h1>
</header>
Example: Header basic html
<!DOCTYPE html>
<html lang="en">
<head>
    <meta charset="UTF-8">
    <meta name="viewport" content="width=device-width, initial-scale=1.0">
    <title>My Website</title>
    <link rel="stylesheet" href="styles.css">
</head>
<body>

<header>
    <a href="#home"><img src="logo.png" alt="My Website Logo"></a>
    <h1>My Website</h1>
    <nav>
        <ul>
            <li><a href="#home">Home</a></li>
            <li><a href="#about">About</a></li>
            <li><a href="#services">Services</a></li>
            <li><a href="#contact">Contact</a></li>
        </ul>
    </nav>
</header>

</body>
</html>
Note: The <header> tag is not the only option for creating a header. You can also use <div> or <section> tags with a class like class="header". The key is to structure this section at the top of your webpage.
If you’d like, you can refer to my GitHub repository for a simple and responsive header example. My Github repo.
How to Create a Header for a WordPress Site.
There are two ways to create a Header in WordPress sites with code or drag-and-drop builder
- 1. With Easy Drag and Drop Builders. using themes like Astra Header Builder or Elementor.
- 2. Creating with code using the header.php file adding inside code.
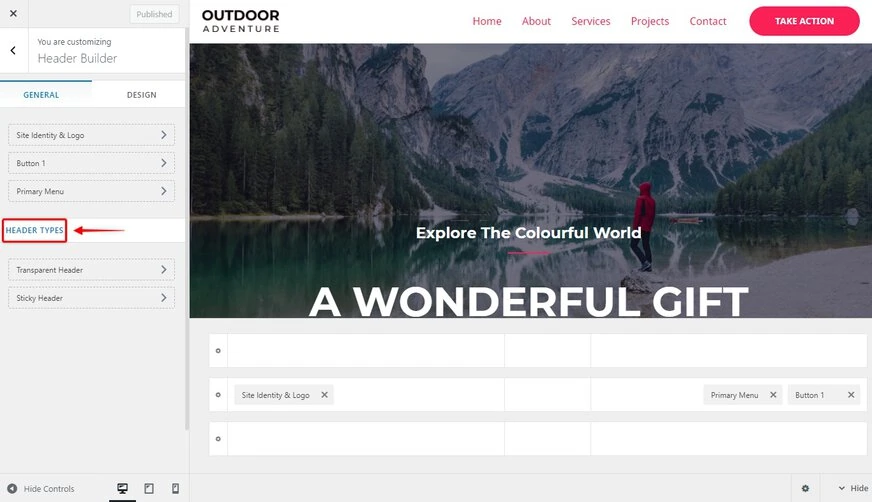
1. Using Easy Drag-and-Drop Builders
You can create a header without touching any code by using drag-and-drop builders. Popular options include:
- Astra Header Builder: The Astra theme offers a built-in header builder that allows you to drag and drop elements like logos, menus, and buttons to create a custom header.
- Elementor: With Elementor, you can design a completely custom header using its drag-and-drop interface. You can add various elements and style them easily, all within the WordPress dashboard.
Elementor-Pro offers you free drag-and-drop canvas options, allowing you to easily design custom headers without needing to write any code.
How to Create a Header with Elementor Pro
Elementor Pro offers powerful tools to design custom headers with ease. Here’s how you can create a header using Elementor Pro:
1. Install and Activate Elementor Pro
Before you can start designing, make sure you have both Elementor and Elementor Pro installed and activated on your WordPress site.
- Go to the Dashboard: Log in to your WordPress admin dashboard.
- Install Elementor: Navigate to
Plugins > Add New, search for “Elementor,” and install the plugin. - Activate Elementor Pro: Upload the Elementor Pro plugin file (you can download it from your Elementor account), then activate it.
2. Create a New Header Template
- Access Theme Builder:
- Go to
Templates > Theme Builderin the WordPress dashboard. - Click on the
Add Newbutton and selectHeaderfrom the dropdown menu.
- Go to
- Choose a Pre-designed Template or Start from Scratch:
- Elementor Pro offers various pre-designed header templates. You can either choose one of these templates or start with a blank canvas.
- Design Your Header:
- If you choose a pre-designed template, simply customize it by clicking on the elements you want to edit.
- For a blank canvas, use Elementor’s drag-and-drop editor to add elements such as your site logo, navigation menu, buttons, and more.
3. Add and Customize Header Elements
- Add Elements:
- Use the Elementor widgets to add elements like
Site Logo,Nav Menu,Button, andSearch. Drag and drop these widgets into your header layout.
- Use the Elementor widgets to add elements like
- Customize Each Element:
- Click on each widget to customize its settings, such as changing the logo image, configuring the menu items, or adjusting the button text and style.
- Style Your Header:
- Use Elementor’s styling options to adjust typography, colors, spacing, and more. You can also add background images or colors to your header section.
4. Set Display Conditions
- Configure Display Conditions:
- After designing your header, click the
Publishbutton. Elementor will prompt you to set display conditions. - Define where you want the header to appear (e.g., across the entire site, on specific pages, or for specific post types).
- After designing your header, click the
- Save and Publish:
- Once you’ve set your display conditions, click
Save & Closeto publish your header.
- Once you’ve set your display conditions, click
5. Preview and Test
- Preview Your Header:
- Visit your site to see how your new header looks. Make sure to test it on different devices to ensure it’s responsive and displays correctly.
- Make Adjustments:
- If needed, return to the elementor editor to make any adjustments or refinements to your header design.
How to Create a Header in WordPress Without a Plugin
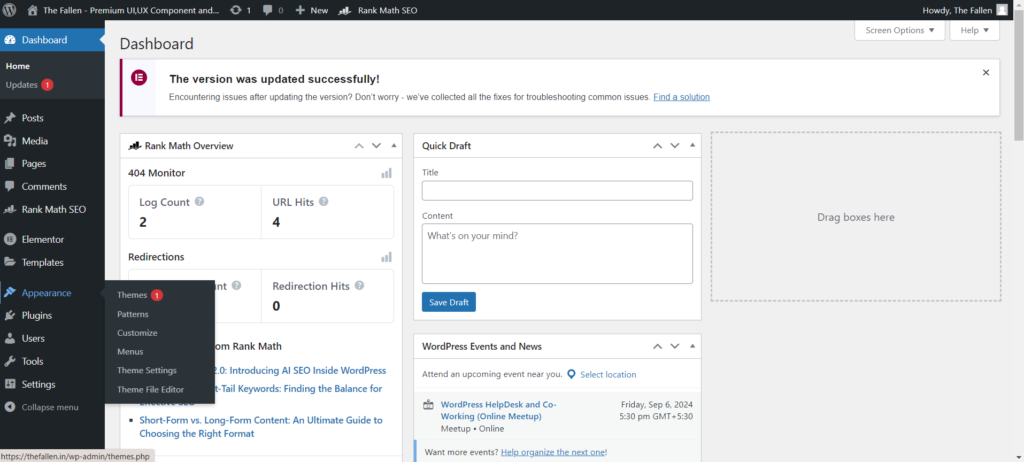
1. Access Theme Files
- Go to the Dashboard:
- Log in to your WordPress admin dashboard.
- Navigate to Theme Editor:
- Go to
Appearance > Theme File Editor. You may need to select the theme you want to edit from the dropdown menu.
- Go to
2. Edit the header.php File
Add Header Code:
- You’ll see the HTML and PHP code that generates the header for your theme. You can modify this code or add new elements to create your custom header.
Locate header.php:
In the Theme File Editor, find and select the header.php file from the list of theme files on the right.
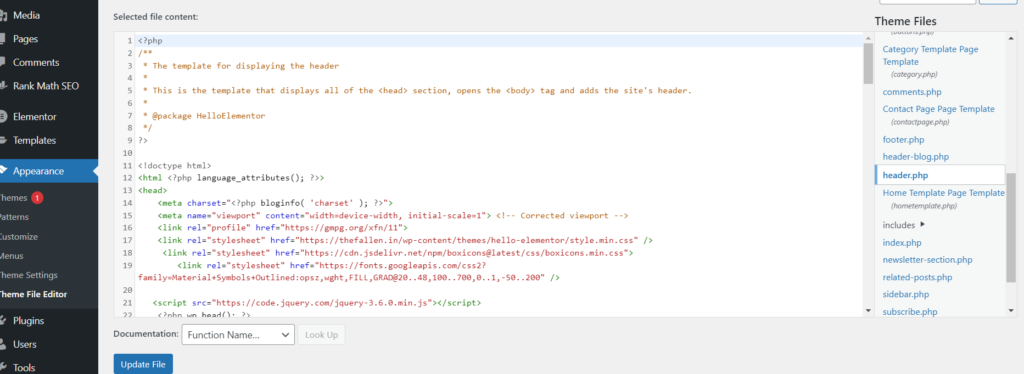
If you’re ready to experiment with the header.php file, here’s an example to guide you through it.
Example: Header.php code
<!DOCTYPE html>
<html <?php language_attributes(); ?>>
<head>
    <meta charset="<?php bloginfo( 'charset' ); ?>">
    <meta name="viewport" content="width=device-width, initial-scale=1.0">
    <?php wp_head(); ?>
</head>
<body <?php body_class(); ?>>

<header class="site-header">
    <div class="header-container">
        <a href="<?php echo esc_url( home_url( '/' ) ); ?>" class="site-logo">
            <img src="<?php echo get_template_directory_uri(); ?>/images/logo.png" alt="<?php bloginfo('name'); ?>">
        </a>
        <nav class="site-navigation">
            <?php wp_nav_menu( array( 'theme_location' => 'primary-menu' ) ); ?>
        </nav>
    </div>
</header>
Add Header Styles
- Edit
style.css:- To style your header, you’ll need to add CSS rules. Go to the
style.cssfile, which is typically located in the Theme File Editor.
- To style your header, you’ll need to add CSS rules. Go to the
- Add CSS Rules:
- Add your custom styles to
style.cssto style the header. For example:
- Add your custom styles to
.site-header {
    background-color: #333;
    color: #fff;
    padding: 20px 0;
}

.site-logo img {
    height: 50px;
}

.site-navigation {
    text-align: right;
}

.site-navigation ul {
    list-style: none;
    padding: 0;
}

.site-navigation ul li {
    display: inline-block;
    margin-left: 20px;
}

.site-navigation ul li a {
    color: #fff;
    text-decoration: none;
}
Index.php file – To use headers in all pages. u need to write functions for these – Using get_header() and get_footer()
<?php
/**
 * The site's entry point.
 *
 * Loads the relevant template part,
 * the loop is executed (when needed) by the relevant template part.
 *
 * @package example
 */

get_header(); // Load the header
?>

<!-- Main content of the page goes here -->

<?php
get_footer(); // Load the footer
?>
Optional: Registering Header and Footer Areas
If you want to create dynamic header and footer areas that can be customized via the WordPress Customizer or Widgets, you can register widget areas in your functions.php file:
phpCopy codefunction mytheme_register_sidebar() {
    register_sidebar( array(
        'name'          => 'Header Widget Area',
        'id'            => 'header-widget-area',
        'before_widget' => '<div class="header-widget">',
        'after_widget'  => '</div>',
    ) );
    register_sidebar( array(
        'name'          => 'Footer Widget Area',
        'id'            => 'footer-widget-area',
        'before_widget' => '<div class="footer-widget">',
        'after_widget'  => '</div>',
    ) );
}
add_action( 'widgets_init', 'mytheme_register_sidebar' );
Pro Tip: You can use multiple headers; for example, header.php is for global for blogs, blogheader.php, you can add blogheader.php in a particular page
<?php include(get_template_directory() . '/header-blog.php'); ?>For more insights and updates on WordPress design and development, stay connected with us! Follow our latest articles, tutorials, and tips by reaching out through our social media channels or contacting us directly. We’re here to help you build a better website—let’s stay in touch!

Get in touch
Looking for another service? Get in touch with me, there is a high chance that I will be able to help!


The Super Simple Way to Add a Stunning FAQ Section to Your Website No Plugins Needed!
Stunning FAQ Section to Your Website – A well-designed FAQs (Frequently Asked Questions)…
How to add custom styles for WP Login/Registration page
How to add custom styles for WP Login/Registration page Customizing the look and…

How to create WordPress theme – Beginners step-by-step guide
How to create WordPress theme – Creating a WordPress theme allows you to…
How to change WordPress login page logo with code
To change the WordPress login page icon via code, add the following snippet…